Having fun with ASM: Lesson 1!
Please note that this tutorial was originally written by HackMew. I have only improved and modernized it slightly.
Requirements
No$gba, No$gba debug, ASM assembler, hex editor, and some ROMs.
Introduction
How many times have you ever heard the word “ASM”? No matter how many, what’s behind that mysterious acronym?
ASM stands for assembly, which is a low-level programming language. Generally speaking, programming languages can be split into 4 main categories. At the lowest level we have machine code: raw (binary) numbers that the CPU decodes into instructions to execute. On the higher level we have assembly. Each assembly instruction corresponds to one machine code instruction. In fact there’s a 1:1 relationship between machine code and assembly. Human beings aren’t made to program in machine code, where all you have is a long series of binary numbers. That’s why assembly programming was created: to let programmers interact with the CPU at the lowest level yet using an easily understandable code. One step up are compiled languages like C, which use structured language element to be more like English, but need to be compiled to machine code in order to be able to run. Finally, there are scripted languages like VB or Java which are run through interpreters designed to run the right kinds of machine code to get the desired effects.
When dealing with ASM, we’re basically programming. Therefore we need to know how a processor actually works and write code it can understand. Being a programmer already will sure help here because the main concepts are the same.
ARM and THUMB
We talked about ASM in general, but from now on we will refer to the GBA. The GBA itself has a custom processor created by Nintendo, called ARM7TDMI. The CPU has 2 instruction sets: ARM and THUMB. For our purposes we’re going to use THUMB 99.9% of the times. THUMB takes less space into ROM (half the size compared to ARM) and it’s executed a lot faster when located in the ROM. There are some cons, indeed. Nothing we should care about now, though.
Getting Started
Like I wrote in the Requisites, an ASM assembler is required. A link will be provided later.
Since most assemblers, if not all of them, are command line-based you’ll need to use a command prompt. If you have no idea what a command prompt is, you better stop here for now and get more info about it before continuing.
Once you’re familiar with the command prompt, you can download the thumb.zip file which contains the assembler we’re going to use. Extract all the 3 files inside a folder (for example on the Desktop) and open a command prompt window. Something similar will appear:
Copyright (c) 2009 Microsoft Corporation. All right reserved.
Now navigate to the directory where the file were extracted earlier:
Copyright (c) 2009 Microsoft Corporation. All right reserved.
C:\Users\YourName\Desktop>
Now that you’re in the right folder, you’re ready to assemble your first (THUMB) ASM routine. What exactly? Good question. Since this is the first lesson I prepared for you a simple routine. Here’s the file: lesson1.zip. It includes 3 different versions, depending on the game you’re hacking. Download it and put the right .asm file in the same directory where the assembler is. Then rename it to lesson1.asm. To assemble it do the following:
Copyright (c) 2009 Microsoft Corporation. All right reserved.
C:\Users\YourName\Desktop>thumb lesson1.asm lesson1.bin
Assembled successfully.
If everything went fine, you’ll get the “Assembled successfully” message as shown above. In case you didn’t specify the “lesson1.bin”, the resulting file would be the same name as the .asm source, except with a .bin extension. Now open the lesson1.bin file through a hex editor, copy its content and paste it into a free space area inside your ROM, paying attention to overwrite the existing free space, and not to insert new bytes. In the latter case, in fact, everything would be shifted down, and the ROM size increased. Definitely not what we want. Also, Make sure the offset ends with either 0, 4, 8 or C. For example, 0x800000 is a good offset while 0x91003D is not. That is needed in order for the game to execute the routine properly. Write down the offset (or just memorize it, if you feel doing so) because you’ll need it soon.
Testing it out
The ASM routine was correctly inserted into the ROM. Now it’s time to test it. Prepare a script like this, where Your Offset must be replaced with the offset you wrote down before + 1. Example: 0x871034 + 1 = 0x871035. Why? That’s needed by ROM so that it will correctly run our routine using the THUMB instruction set. If you don’t add 1, the routine will be treated as ARM, hence it won’t work. I’ll assume you’re using XSE, so if you’re using a different script editor you’ll have to pay attention about the proper syntax needed. The script itself is pretty simple and since this is not a scripting tutorial, I’m not going to explain it any further.
#dynamic 0x800000

#org @start
callasm YourOffset
buffernumber 0x0 LASTRESULT
msgbox @secret 0x2
end

#org @secret
= Sshh! I'll tell you a secret[.]\nYour Secret ID is [buffer1]!
Compile the script and assign it to a person. Then load the emulator and talk to the person.
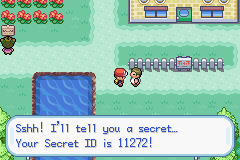
If you did everything correctly you’ll get something like this:
 Our script in action.
How it works
So far we merely inserted a routine and we called it from a script. We have no idea what happens behind the scenes, yet. Except one thing: the routine is used to retrieve the Secret ID. Well, not truly secret any more, eh? The Secret ID is stored into the RAM along with other info about the player. The structure is the following:
[Name (8 bytes)] [Gender (1 byte)] [??? (1 byte)] [Trainer ID (2 bytes)] [Secret ID (2 bytes)]
[Hours of play (2 bytes)] [Minutes (1 byte)] [Seconds (1 byte)] [Frames (1 byte)]
[??? (1 byte)] [Options (2 bytes)]
Let’s see the .asm file in detail now. Remember it’s a plain text file so Notepad will be able to read it just fine. Since the 3 routines are mostly the same I’ll explain the FireRed version first, then the differences between the different versions.
On the very first line we can see:
.text
This is a directive that will tell the assembler to assemble the following lines in the .text code section of the temporary object file which is created.
.align 2
This is a directive that will byte align the following code by 2 bytes. Since it’s a THUMB routine it must be 2.
.thumb
This is a directive to inform the assembler the following lines will use the THUMB instruction set.
.thumb_func
This directive will state the fact we’re using THUMB. Both .thumb and .thumb_func are needed.
.global lesson1
Optional. This can be whatever you decide to call the routine.
main:
This is a label called “main”. It’s a good behavior to call the main as such.
push {r0-r1, lr}
Here the true THUMB code starts. This instruction will push registers from r0 to r1, along with the Link Register into the stack. “What the heck are registers? Stack??”
Registers are special memory areas which are 32 bits wide hence they can hold numbers up to 4 bytes. They can be accessed by simply calling their name. There’s a total of 16 registers, from r0 to r15. A bit more in detail:
- r0-r12: These 13 registers are the so called General Purpose Registers, which means they can be used for whatever reason you may have. However in THUMB mode, r0 – r7 (Low Registers) can always be used whereas r8 – r12 (High Registers) can be used only by some instructions.
- r13: While in ARM mode the user can choose to use r13 or another register as a Stack Pointer, in THUMB mode this register is always used as Stack Pointer.
- r14: This is used as Link Register. When calling to a sub-routine by a branch with a Link instruction, the return address is stored in this register. Storing the return address is a lot faster then pushing it into memory, however there’s only one LR register for each mode so the user must manually push its content before issuing “nested” subroutines.
- r15: This is used as Program Counter, when reading from r15 it will return a value of PC+n because of read-ahead (pipelining) while “n” depends on the instruction and on the CPU state (THUMB or ARM).
- Stack: besides registers, there’s another special memory area called “Stack”. It’s used to store the value of registers into it so that you can safely modify them. When you store something into the stack, that’s called “pushing”. When you’re done, you will do the opposite. That is, “popping”. When you pop a register, its value will be restored to its previous state.
Originally Posted by Wikipedia
A frequently used metaphor is the idea of a stack of plates in a spring loaded cafeteria stack. In such a stack, only the top plate is visible and accessible to the user, all other plates remain hidden. As new plates are added, each new plate becomes the top of the stack, hiding each plate below, pushing the stack of plates down. As the top plate is removed from the stack, they can be used, the plates pop back up, and the second plate becomes the top of the stack. Two important principles are illustrated by this metaphor: the Last In First Out principle is one; the second is that the contents of the stack are hidden. Only the top plate is visible, so to see what is on the third plate, the first and second plates will have to be removed.
To sum it up, when we use push {r0-r1, lr}, we’re storing – or better, pushing – registers from r0 to r1 and the Link Register into the stack. So, following the above metaphor, r0, r1 and lr would become the top plate.
ldr r0, .PLAYER_DATA
This THUMB instruction will load the value of our custom symbol called .PLAYER_DATA into the register r0.
ldr r0, [r0]
This THUMB instruction will load into r0 the value pointed by the actual value of r0. Yes, you’ve guessed right: .PLAYER_DATA is a memory address which holds a pointer to the player data. First we loaded the address into r0, then we loaded into the same register the value located at the address stored in the register itself.
ldr r1, .VAR
This THUMB instruction will load into r1 the value of the symbol .VAR, which is the memory address of the variable 0x800D, LASTRESULT.
ldrh r0, [r0, #0xC]
Right now in r0 we have the memory address of the player data. If you start counting from the first byte of the name till the Secret ID, you’ll end up with 12 (0xC) bytes. So this THUMB instruction will load an half-word stored at the address r0 + 0xC. Not surprisingly, that’s exactly where the Secret ID is stored. Why half-word? And, more important: what are half-words? Except for “byte” which is always 8 bits, there isn’t a strict convention about its multiples. When talking about ASM, anyway, we define word a 32 bits value. Therefore an half-word (as the name suggests) is 16 bits. And the Secret ID takes 2 bytes, or 16 bits indeed.
strh r0, [r1]
This THUMB instruction will store the value held by r0 (which is our Secret ID) at the address pointed by r1, which is LASTRESULT. Note that we’re using the “h” suffix once again. In fact we’re storing an half-word since variables are 16 bits wide (from 0x0 to 0xFFFF).
pop {r0-r1, pc}
This THUMB instruction will revert the effect of our previous push. Remember that when you push a variable and you change its value, you should always pop it back.
.align 2
Assembler directive. Nothing new actually. Just don’t forget it.
.PLAYER_DATA:
This is a label used to define the .PLAYER_DATA symbol used by the routine.
.word 0x0300500C
Assigns the word (32 bits) 0x300500C to .PLAYER_DATA.
.VAR:
This is a label used to define the .VAR symbol used by the routine.
.word 0x020270B6 + (0x800D * 2)
Assigns the word (32 bits) 0x020270B6 + (0x800D * 2) = 0x020370D0 to .VAR. If you’re wondering about the “weird” format, I made that to make it easier changing the variable used. Note however this would work only for temporary variables, 0x800D onwards. For the previous temporary variables, just increase the main address by 2 (in the example above, you would change it to .word 0x020270B8 + (0x8000 * 2), if you were to use variable 0x8000).
For the sake of precision, I’ll explain you how memory is used by the GBA.
- System ROM/BIOS: starts at 0x0000000 with a length of 16KBs, this section contains BIOS memory which is strictly read-only.
- External Working RAM/EWRAM: starts at 0x2000000 and has a length of 256 KB. Since it contains a 16-bit databus, THUMB is best used here. It allows 8, 16 and 32 bits read/write.
- Internal Working RAM/IWRAM: begins at 0x3000000 and has a length of 32 KB with a 32-bit databus thus making it fast for ARM code. It allows 8, 16 and 32 bits read/write.
- Register Memory/IO: begins at 0x4000000 going up to 1 KB. This is where you control graphics, sound, timing, keypressing etc. Besides the name, it has absolutely nothing to do with the actual registers: r0-r15.
- Palette Memory: starts at 0x5000000 going up to 1 KB. This area contains 2 palettes: backgrounds and sprites, respectively.
- Video Memory/VRAM: starts at 0x6000000, graphic data (tilesets, sprites, tilemaps) are stored here. Sprites are usually stored starting from 0x6010000.
- Object Attribute Memory/OAM: begins at 0x7000000 with a length of 1 KB. This is where you control sprites such as storing width, height, or location to sprite graphic data.
- ROM: begins at 0x8000000 going to a maximum of 32 MB, usually. THUMB is the best choice over here.
If you compare the FireRed and Emerald routine you’ll see they’re pretty much the same, except the .PLAYER_DATA and .VAR values. Since FireRed and Emerald are different games, that’s predictable if not obvious. Except for the different value the Ruby one seems to be missing something though. In particular the ldr r0, [r0] line. What’s the reason?
Normal RAM hacking, relies heavily on the fact – whether you realize it or not – that the data you are searching for is static (stays in the same place), at least for the duration of the search. To fight hackers, some data in FR/LG and Emerald is stored in dynamic locations – i.e. it is moving constantly, for example whenever you open a menu or you leave a map. The method is called DMA, or Dynamic Memory Allocation. This scheme is actually weak though: somewhere in the RAM, there must be a value that tells the game where the data in question is currently stored: a pointer. Ruby has no such protections therefore we can load the memory address directly into the register. When dealing with FR/LG and/or Emerald instead, we must first load the address that contains the pointer to the actual data, and then load the pointer itself.
Let’s debug
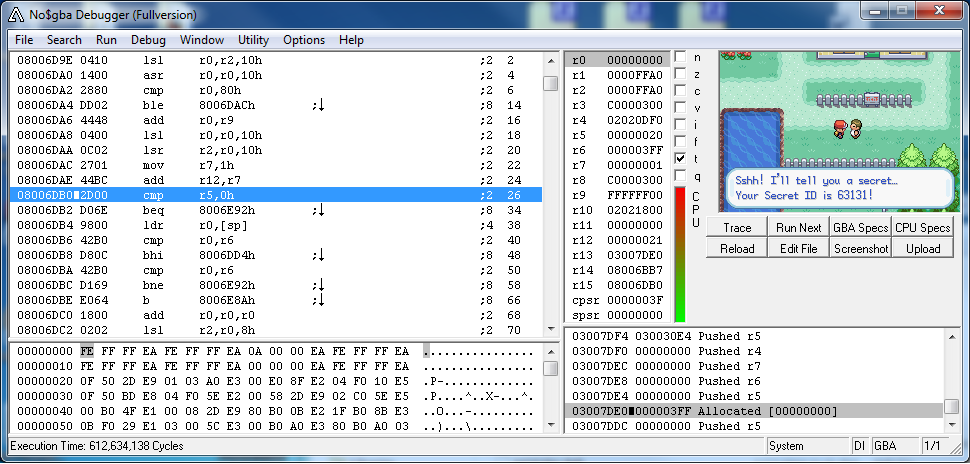
The routine we used was (relatively) simple, but as soon as the routines grow and get more and more complicated, you can’t just rely on simply using a callasm to see if they work or not. Especially in the latter case. That’s when a debugger comes in handy. So if you didn’t download it yet, this is the right moment to do it: no$gba.
Load your ROM (File – Cartridge Menu). Then right click in the area with the assembly code. Click “Goto …”, enter the offset of the routine, and click OK. Do not forget to add 0x08000000 to your offset since it is located in ROM memory. You can double click a line of code to set a breakpoint. Put a breakpoint on the offset of the routine.
Play the game and talk to the person you gave the script to. If you set the breakpoint correctly the game will stop and take you back to the code window.
If you look to the right of the code window you’ll notice that the contents of the registers are displayed. You can click the button called “Run Next” to execute the next line of code. Using this you can follow routines to make sure they are working correctly. Before pressing the button, it’s always best to make assumptions about the possible content of the registers after each instruction. This way you’ll be able to compare the results you’re getting with your expected results, and therefore you can see if the routine is working properly or not.
Downloads
Useful references
- Wikipedia
- Whirlwind Tour of ARM Assembly
- Official ARM7DTMI Technical Manual
- GBATek
- THUMB Quick Reference
- Assembler Quick Reference
- Assembler Manual
Conclusion
I hope this will help those that are new to ASM. The next lesson will be a rewrite of HackMew’s lessson 2 and will be a bit more advanced. Please feel free to comment with any questions you may have!


